Video Interpretation Help
Below are a few common tasks when using Video Interpretation
Starting a Video Interpretation session
Fill in all the required session information in the fields provided on the left.
Verify that your camera and microphone are working using the preview on the right.
Click the Start Session button when you are ready to begin your Video Interpretation session.
Note: Depending on how your Account and PIN are configured, additional entry fields may appear on the left. For example, if your PIN is configured to track an employee id with the video session, it would appear on the left as an additional entry field.
Note: Depending on how your Account and PIN are configured, additional entry fields may appear on the left. For example, if your PIN is configured to track an employee id with the video session, it would appear on the left as an additional entry field.
Stopping a Video Interpretation session
When a session is in progress there is a Stop Session button under the Video Interpretation video.
Click the Stop Session button to end your session.
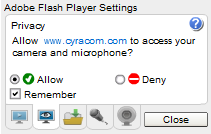
Adobe Flash® Camera and Microphone Privacy
If this is the first time you have used the CyraCom Video Interpretation feature, you may see an
Adobe Flash® dialog asking you to “Allow” or “Deny” access to your camera and
microphone. You must allow access to use this feature. If you do not wish to choose
this each time you want to use CyraCom’s VRI features, you may optionally click
“Remember” to save this choice.
Adobe Flash® Privacy Settings
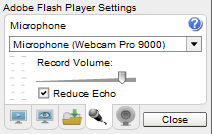
Adobe Flash® Camera and Microphone Settings
If your camera or microphone do not appear to work, switch to the corresponding
tabs and make sure each device is chosen from the provided list.
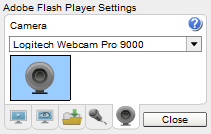
Adobe Flash® Camera Settings
Adobe Flash® Microphone Settings
Video Preview
This window will show you a preview of the image your camera sees. You can take
a moment before you start your session to ensure that you will be visible to the
interpreter. If you move your mouse over the video window, you will see a controls
bar. This controls bar gives you some control over your Video Interpretation experience.
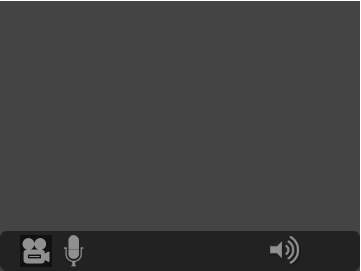
Video Interpretation Preview Mode with Controls Bar
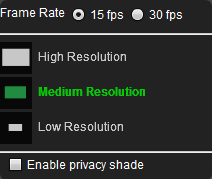
Camera Options
The camera button toggles on and off your camera. If you wish to hide your video
from the interpreter, simply click the camera and a red X will appear to indicate
that the interpreter can no longer see you. Click again to resume your video. Hovering
over the icon will pop up a list of video quality choices. This will change the
quality of the video your camera sends to the interpreter. Choose from Low, Medium
and High quality. This may be useful if you are on a slow internet connection and
the interpreter is having difficulty seeing your video stream.


Video Interpretation Camera Toggle
Video Interpretation Camera Quality Settings
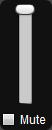
Microphone Options
The microphone toggle mutes your microphone. Click the icon to temporarily disallow
the interpreter from hearing you. Click again to resume sending audio.


Video Interpretation Microphone Toggle
Speaker Volume Options
The speaker icon allows you to adjust the volume at which you hear the interpreter.
Hovering over the button will give you a slider to adjust up or down how loud the
interpreter sounds. Clicking will toggle on and off the volume entirely.


Video Interpretation Speaker Mute Toggle
Video Interpretation Speaker Volume
Video Size
The screen size icon will allow you to choose what size the video displays on your
computer. You can choose from small, medium, large or full-screen.

Video Interpretation Video Size Options
Note: This option is only available when in an active session.